
 Jeremiah Swank
 React Unit Testing
Unit testing in React is a crucial practice that ensures individual components and functions within an application work as expected. By isolating these components and testing them independently, developers can catch bugs early in the development process, leading to more reliable and maintainable code.
React’s component-based architecture lends itself well to unit testing, as each component can be treated as a small, testable unit. Tools like Vitest and React Testing Library are commonly used to create and run these tests, allowing developers to simulate user interactions, check outputs, and verify that components render correctly under different conditions. Through unit testing, React applications become more robust, easier to refactor, and better equipped to handle future changes.
Vitest
Vitest is a fast, modern testing framework for JavaScript and TypeScript applications, designed to work seamlessly with Vite, a popular build tool. It offers a similar API to Jest, making it easy for developers familiar with Jest to adopt Vitest. The key advantage of Vitest lies in its integration with Vite, allowing it to leverage Vite’s fast, efficient build process for running tests. This makes Vitest particularly well-suited for modern web applications, where speed and developer experience are paramount.
Vitest supports features like snapshot testing, mocking, and coverage reports, and it can be used to test both unit and end-to-end components. It’s known for its speed, thanks to its ability to run tests in parallel and hot-reload test files, which significantly enhances the developer’s productivity during the testing process.
To get started with Vitest, you’ll need to install it as a development dependency in your project:
npm install -D vitest
Next, you’ll want to add a script to your package.json file to run your tests:
//package.json
{
    ...
    "scripts": {
        ...
         "test": "vitest"
    }
}
Define a basic test file. Vitest will automatically pickup files with .test in the name:
//hello.test.ts
import { test, expect } from "vitest"; // must import methods used for testing

test("My First Test", () => {
  expect(2 + 2).toBe(4);
});
It is important to note that in vitest you must import all methods used for testing includng test and expect. Make sure your are importing them from the vitest package and not from another node packages. Run your test script:
npm run test
And you should see the ourput for the tests in your console:
✓ src/hello.test.ts (1)
   ✓ My First Test

 Test Files  1 passed (1)
      Tests  1 passed (1)
   Start at  10:37:38
   Duration  151ms (transform 15ms, setup 0ms, collect 10ms, tests 1ms, environment 0ms, prepare 30ms)
From here you can start to write tests for your files and vitest should pick them up automatically:
//add.test.ts
import { test, expect } from "vitest";
import { add } from "./add";

test("Test Add", () => {
  expect(add(2, 2)).toBe(4);
});
VItest also provides methods for performing tasks before and after tests:
import { afterEach, afterAll, beforeAll, beforeEach } from "vitest";

beforeAll(() => {
  // run code here before all tests in the file
});
beforeEach(() => {
  // run code here before each tests in the file
});
afterEach(() => {
  // run code here after each tests in the file
});
afterAll(() => {
  // run code here after all tests in the file
});

// add your tests down here
JSDOM
If you are writing tests for the web you will run into issues where web APIs available in the browser are not available in your test environment. For example imagine you had a function like this:
//navigate.ts

function goToAboutPage() {
  window.location.href = "/about";
}
This function works perfectly in the browser but when running from your command line you will get this error:
 FAIL  src/navigate.test.ts > Test Navigation
ReferenceError: window is not defined
 ❯ goToAboutPage src/navigate.test.ts:4:3
      2|
      3| function goToAboutPage() {
      4|   window.location.href = "/about";
       |   ^
      5| }
      6|
 ❯ src/navigate.test.ts:9:3
This is because the window API only exists in the browser. It does not exist in the test environment. JSDOM provides an implementation of most browser APIs so that you can run your tests in a simulated browser environment. To use JSDOM, you’ll need to install it as a development dependency:
npm install -D jsdom
By default vitest uses the node environment so you must update your vite.config.ts file to use the jsdom environment:
/// <reference types="vitest/config" />
import { defineConfig } from "vite";
import react from "@vitejs/plugin-react";

// https://vitejs.dev/config/
export default defineConfig({
  plugins: [react()],
  test: {
    environment: "jsdom",
  },
});
React Testing Library
React Testing Library provides utilities to render components in a test environment, query the rendered output, and simulate user interactions such as clicks, typing, and form submissions. It emphasizes best practices like accessibility and encourages testing components as a whole, including their effects and interactions with other components or services. By prioritizing how components are used rather than how they’re built, React Testing Library helps ensure that tests remain aligned with the actual user experience.
To setup React Testing Library, you’ll need to install the following packages:
npm i -D @testing-library/react @testing-library/dom @testing-library/jest-dom
Create a vitest.setup.ts file in your project root and add the following code:
import "@testing-library/jest-dom/vitest";
Then add the setup file to your vite config:
/// <reference types="vitest/config" />
import { defineConfig } from "vite";
import react from "@vitejs/plugin-react";

// https://vitejs.dev/config/
export default defineConfig({
  plugins: [react()],
  test: {
    setupFiles: "vitest.setup.ts",
  },
});
This will ensure all the custom matchers types are available in your tests. That is all the setup needed to get started with React testing library. Next we will explore some different testing methods that utilize react testing library.
Snapshot testing
Snapshot testing is a technique used to verify that the output of a component or function remains consistent over time. It works by capturing a “snapshot” of the rendered output (usually in the form of a JSON object) during the initial test run. This snapshot is then saved and compared against future test runs. If the output changes, the test will fail, alerting the developer to a potential unintended change in the component’s behavior or appearance.
Snapshot testing is particularly useful in UI testing, where the structure of the rendered component (including its HTML, styles, and other outputs) can be compared against the expected structure to detect changes.
Writing snapshot tests
Here’s an example of how you might use snapshot testing in a React component with Vitest:
1. Create a React Component:
//Button.tsx
type Props = {
  label: string;
};

export function Button({ label }: Props) {
  return <button>{label}</button>;
}
2. Write a Snapshot Test:
//Button.test.tsx
import { render } from "@testing-library/react";
import { expect, test } from "vitest";
import { Button } from "./Button";

test("Button renders correctly", () => {
  const { container } = render(<Button label="Click me" />);
  expect(container).toMatchSnapshot();
});
In this example:
render(<Button label="Click me" />)renders the Button component.toMatchSnapshot()compares the current output to the saved snapshot.
3. Run the Test:
npx vitest run
During the first run, Vitest will create a snapshot file that contains the rendered output of the Button component. This file is stored in a __snapshots__ directory next to your test file.
// __snapshots__/Button.test.tsx.snap
// Vitest Snapshot v1, https://vitest.dev/guide/snapshot.html

exports[`Button renders correctly 1`] = `
<div>
  <button>
    Click me
  </button>
</div>
`;
Alternatively you can use toMatchInlineSnapshot() matcher to output the snapshot inline in the test. This works well for small components but can be a bit verbose for larger components.
4. Handling Snapshot Changes:
If you make changes to the Button component (e.g., changing the label or adding styles), the next test run will fail if the output no longer matches the snapshot. If the changes are intentional, you can update the snapshot by running:
npx vitest -u
This command will regenerate the snapshot to match the new output.
Benefits and Use Cases
- UI Regression Testing: Snapshot testing is excellent for catching unintended changes in the UI.
- Quick Feedback: Developers get quick feedback when a component’s output changes.
- Simple to Implement: Snapshot tests are easy to write and can cover large parts of your UI with minimal code.
npm install -D msw
DOM Querying with React Testing Library
One of the most powerful features of React Testing Library is its ability to query the DOM. This allows you to simulate user interactions and assert on the state of your components. The query methods follow a naming pattern and its important to understand the different methods in order to understand which one to use in your test.
Query Method Prefixes:
Queries are the methods that Testing Library gives you to find elements on the page. There are several ways to query elements:
| Type of Query | 0 Matches | 1 Match | >1 Matches | (Async/Await) |
|---|---|---|---|---|
| Multiple Elements | ||||
| getBy… | Throw error | Return element | Throw error | No |
| queryBy… | Return null | Return element | Throw error | No |
| findBy… | Throw error | Return element | Throw error | Yes |
| Multiple Elements | ||||
| getAllBy… | Throw error | Return array | Return array | No |
| queryAllBy… | Return null | Return array | Return array | No |
| findAllBy… | Throw error | Return array | Return array | Yes |
All queries have their use case. You have to decide do you expect multiplte values to be returned or not? and do you need to async/await for the component to update first?
Query Method Suffixes:
- ByLabelText: find by label or aria-label text content
- ByPlaceholderText: find by input placeholder value
- ByText: find by element text content
- ByDisplayValue: find by form element current value
- ByAltText: find by img alt attribute
- ByTitle: find by title attribute or svg title tag
- ByRole: find by aria role
- ByTestId: find by data-testid attribute
You combine a prefix and a suffix to get one of the possible query methods. Examples: getByLabelText, queryByDisplayValue, findByRole, getAllByTestId, etc. As you can see there are a lot of different ways to query the DOM.
Example Unit Tests
Lets explore some example unit tests using the React Testing Library.
Clicking a Button
//Toggle.tsx
export default function Toggle() {
    const [isToggled, setToggle] = React.useState(false);
  return (
    <button onClick={() => setToggle(!isToggled)}>
      {isToggled ? 'ON' : 'OFF'}
    </button>
  )
}

//Toggle.test.tsx
import { afterEach, expect, test } from "vitest";
import { cleanup, fireEvent, render, screen } from "@testing-library/react";
import Toggle from "./Toggle";

afterEach(() => {
    cleanup();
});

test("Test Toggle", () => {
    //Arrange
    render(<Toggle />);

    //Act
    const off = screen.getByText("OFF");

    //Assert
    expect(off).toBeInTheDocument();
});

test("Test Toggle Click", () => {
    //Arrange
    render(<Toggle />);

    //Act
    const off = screen.getByText("OFF");
    fireEvent.click(off);

    const on =  screen.getByText("ON");
    screen.debug(on);

    //Assert
    expect(screen.getByText("ON")).toBeInTheDocument();
});

test("Test Toggle Click Twice", () => {
    //Arrange
    render(<Toggle />);

    //Act
    const off = screen.getByText("OFF");
    fireEvent.click(off);

    const on = screen.getByText("ON");
    fireEvent.click(on);

    //Assert
    expect(screen.getByText("OFF")).toBeInTheDocument();
    expect(screen.queryByText("ON")).not.toBeInTheDocument();
});
Explanation:
afterEachwithcleanup(): Ensures that after each test, the rendered DOM is cleaned up so that there are no side effects between tests. This is essential for making sure each test runs in isolation and doesn’t interfere with other tests.render(<Toggle />): Renders the Toggle component.screen.getByText("OFF"): queries the DOM to check if the text “OFF” is presentfireEvent.click(): simulate a click on the button to trigger the click eventscreen.queryByText("ON"): queries the DOM again to check if the text “ON” is present but does not throw an error if it is not found.
Clicking Icon Button with no Text
//IconButton.tsx
export default function IconButton() {
  const [isToggled, setToggle] = useState(true);
  return (
    <>
      <button onClick={() => setToggle(!isToggled)}>
        {isToggled ? <Sun /> : <Moon />}
      </button>
    </>
  );
}

//IconButton.test.tsx
import { cleanup, fireEvent, render, screen } from "@testing-library/react";
import { afterEach, expect, test } from "vitest";
import IconButton from "./IconButton";

afterEach(() => {
    cleanup();
});

test("Test IconButton", () => {
    //Arrange
    render(<IconButton />);

    //Act
    const sun = screen.getByLabelText("Sun");

    //Assert
    expect(sun).toBeInTheDocument();
});

test("Test IconButton Toggle", () => {
    //Arrange
    render(<IconButton />);

    //Act
    const sun = screen.getByLabelText("Sun");
    fireEvent.click(sun);
    const moon = screen.getByLabelText("Moon");

    //Assert
    expect(moon).toBeInTheDocument();
});
Explanation:
afterEachwithcleanup(): Ensures that after each test, the rendered DOM is cleaned up so that there are no side effects between tests. This is essential for making sure each test runs in isolation and doesn’t interfere with other tests.render(<IconButton />): Renders the button component.screen.getByLabelText("Sun"): queries the DOM based on thearia-labelattribute of the imagesfireEvent.click(): simulate a click on the button to trigger the click event
Mocking
Mock Service Worker (MSW) is a library that intercepts network requests on the client side, allowing developers to test web applications without relying on an actual backend server. By using service worker API to intercept and modify requests, MSW enables seamless integration of mock responses into the application’s natural workflow. This method of intercepting requests at the network level ensures that the application’s code does not have to be modified for testing purposes, promoting maintainable and realistic tests.
MSW is particularly useful during testing to test error handling and loading states without requiring an active network connection or a live backend. This approach not only speeds up development and testing processes but also provides a controlled environment for robust offline testing, making it an invaluable tool for modern web developers.
To use MSW, install the library using npm:
npm install -D msw
Create a mock file with all of the http mocks you want to use.
//mocks.ts
import { setupServer } from "msw/node";
import { http, HttpResponse } from "msw";

export const handlers = [
  http.get("https://jsonplaceholder.typicode.com/posts/1", () => {
    return HttpResponse.json({
      id: 1,
      title: "Lorem Ipsum",
      body: "Lorem ipsum dolor sit amet, consectetur adipiscing elit.",
    });
  }),
];


export const server = setupServer(...handlers);
This will return an array of two json object whenever https://jsonplaceholder.typicode.com/posts/1 by a component during the tests. Now you can use this mock in your tests:
//Posts.test.tsx
import { afterAll, afterEach, beforeAll } from "vitest";
import { server } from "./mocks";

// Start server before all tests run
beforeAll(() => {
  server.listen();
});

// Reset between tests to gaurantee test always start in the same state
afterEach(() => {
  server.resetHandlers();
});

// Shutdown at the end of tests
afterAll(() => {
  server.close();
});

// Put yout tests here
Since data is loaded asyncronously you may need to use the findBy query in your tests:
//Post.test.tsx
test("Test Post", async () => {
  // Arrange
  render(<Post id={1} />);

  // Act
  const heading = await screen.findByRole("heading");
  const body = await screen.findByTestId("post-body");

  // Assert
  expect(heading).toHaveTextContent("Lorem Ipsum");
  expect(body).toHaveTextContent("Lorem ipsum dolor sit amet, consectetur adipiscing elit.");
});
Testing react hooks
Testing React hooks with the renderHook function from React Testing Library is a common practice for isolating and verifying the behavior of custom hooks. Here’s an example of unit testing a simple custom hook using renderHook.
Let’s create a custom hook called useToggle that manages a boolean state and provides a function to toggle it.
// useToggle.tsx
import { useState } from 'react';

export function useToggle(initialValue = false): [boolean, () => void] {
  const [value, setValue] = useState(initialValue);

  const toggleValue = () => {
    setValue((prevValue) => !prevValue);
  };

  return [value, toggleValue];
}
// useToggle.test.js

test("should toggle the value", () => {
  const { result } = renderHook(() => useToggle());

  const [value, toggleValue] = result.current;

  // Initial value should be false
  expect(value).toBe(false);

  // Toggle the value to true
  act(() => {
    toggleValue();
  });

  expect(result.current[0]).toBe(true);

  // Toggle the value back to false
  act(() => {
    toggleValue();
  });

  expect(result.current[0]).toBe(false);
});
This example demonstrates how to use renderHook to test a custom React hook. By isolating the hook and interacting with it directly, you can verify its behavior independently from any components that might use it. This approach is particularly useful for ensuring the correctness of complex hooks or hooks that encapsulate reusable logic.
Code Coverage
Code coverage reports are tools used in software testing to measure the extent to which your codebase is tested by automated tests. These reports provide a detailed analysis of which lines, functions, branches, and statements in your code have been executed during testing, highlighting areas that have been tested and those that have not. A high code coverage percentage indicates that a large portion of your code is being tested, which can give confidence in the reliability and robustness of the software.
It’s important to note however that high coverage alone doesn’t guarantee quality—tests must also be meaningful and validate the correct behavior of the code. Code coverage reports are valuable for identifying untested parts of the code, guiding the development of additional tests, and improving overall code quality.
Running code coverage reports
To run code coverage with Vitest, you’ll need to enable coverage reporting in your Vitest configuration. Vitest uses v8 under the hood to generate coverage reports. Here’s how you can set it up and run code coverage in your project:
npm i -D @vitest/coverage-v8
To test with coverage enabled, you can pass the —coverage flag in CLI.
npx vitest --coverage
By running npx vitest run --coverage, Vitest will generate code coverage reports that help you understand which parts of your code are tested and which are not. You can customize the reports through the configuration file, choosing from different report formats and specifying which files or directories to include or exclude.
Continuous Integration
Continuous Integration (CI) is a software development practice where developers frequently merge their code changes into a central repository, after which automated builds and tests are run. This practice helps ensure that the codebase remains stable and that new changes do not break existing functionality. GitHub Actions is a powerful tool for implementing CI by automating workflows directly in your GitHub repository.
Create a Workflow File
First, create a YAML file in your repository within the .github/workflows directory. Name file ci.yml.
Define the Workflow Configuration
Edit the ci.yml file to define the workflow configuration. Here’s a simple example of a workflow that installs dependencies, runs unit tests and test coverage on every push to the main branch:
name: Continuous Integration
on:
  push:
    branches:
      - main
jobs:
  test:
    runs-on: ubuntu-latest
    steps:
      - name: Checkout Source Code
        uses: actions/checkout@v4
      - name: Set up Node.js
        uses: actions/setup-node@v4
        with:
          node-version: '20'
      - name: Install dependencies
        run: npm install
      - name: Run Unit Tests
        run: npm run test
      - name: Run Test Coverage
        run: npm run coverage
Understanding the Configuration
- name: This specifies the name of the workflow.
- on: This defines the events that will trigger the workflow. In this case, any push to the main branch.
- jobs: This section defines the jobs that the workflow will execute. The example contains a single job called
test. - runs-on: This specifies the type of virtual environment. Here, it uses the latest version of Ubuntu.
- steps: These are the sequential tasks that the workflow executes. It uses existing GitHub Actions like
actions/checkoutto clone the repository andactions/setup-nodeto set up Node.js. It then runs commands to install dependencies and execute tests
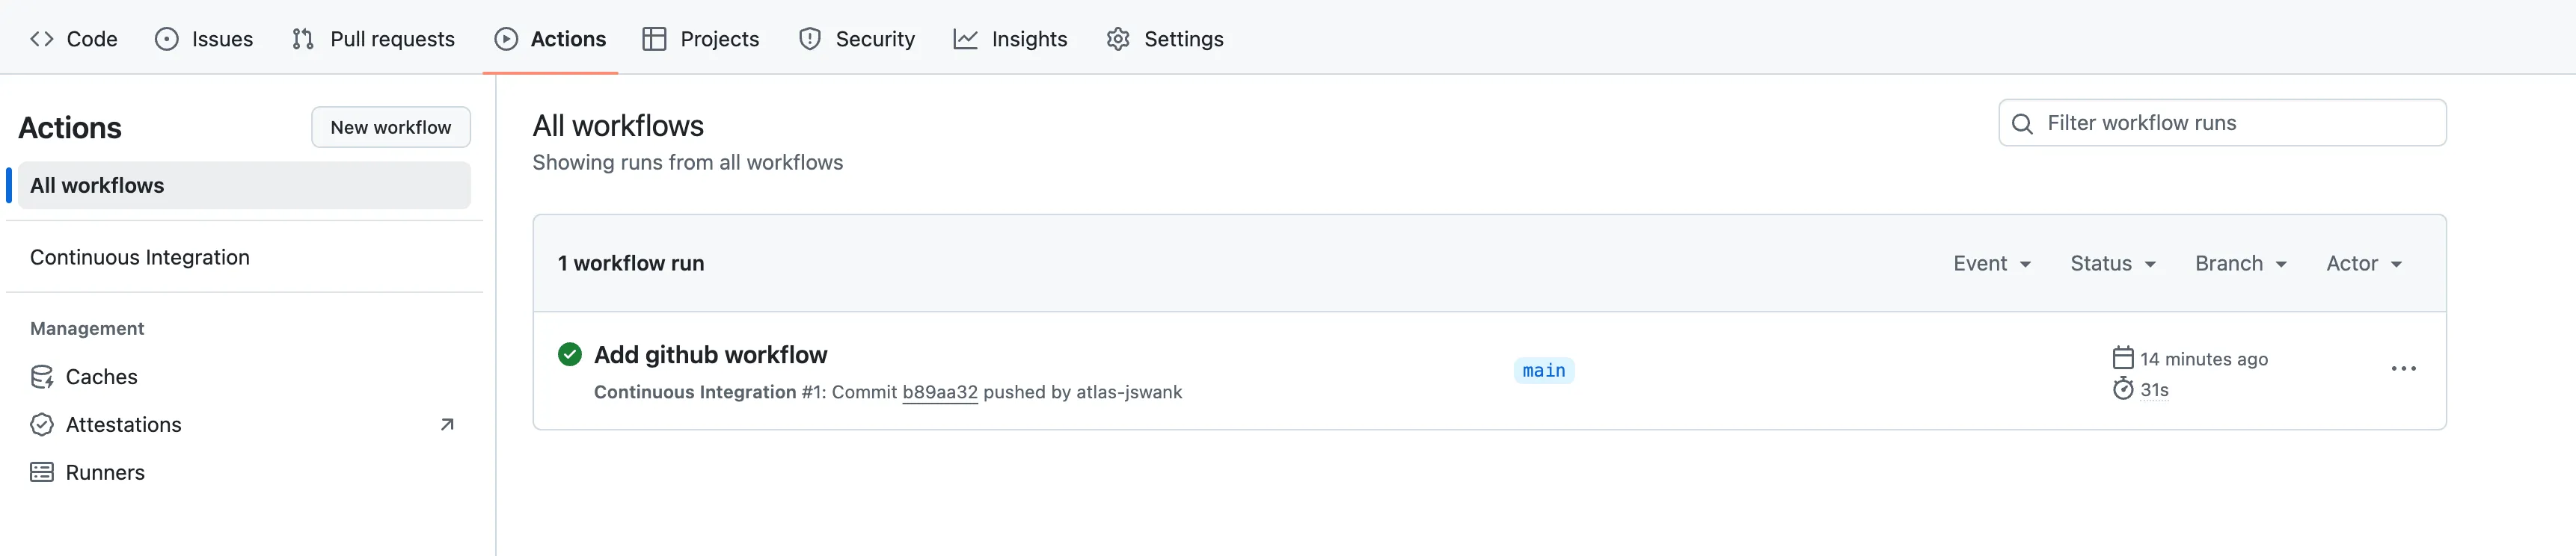
Activate and Monitor the Workflow
Once you commit and push this .yml file to your repository, GitHub Actions will automatically recognize it and start running the defined workflow based on the trigger events. You can monitor the progress and results of these actions in the “Actions” tab of your GitHub repository.
Benefits of CI with GitHub Actions
- Automation: Every commit is automatically built and tested, reducing manual work and speeding up the development process.
- Immediate Feedback: Developers get immediate feedback on their commits, allowing them to quickly fix issues.
- Consistency: Ensures that tests are consistently run in a clean, standardized environment.