 Jeremiah Swank
 Development Containers in VS Code
What are Development Containers?
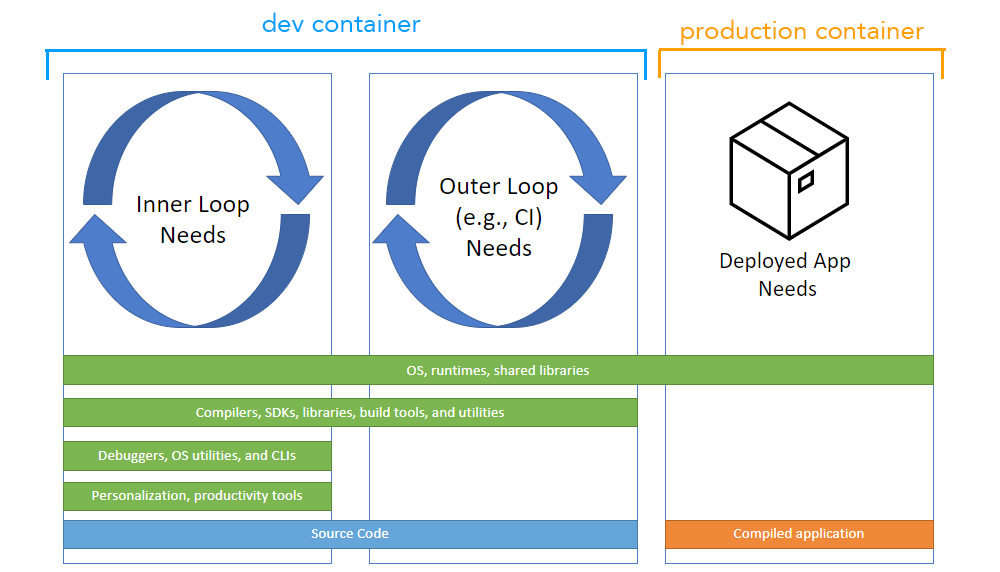
Development containers allow you to develop your application inside a docker container running on your local computer. If you run your application in production in Alpine Linux, then it make sense to also use Alpine linux in development.
One of the benefits to development containers is the configuration can be checked into source control so all developers develop in the same environment independent of their local operating system.
Development containers remove the need to install dependencies on you local machine and dramatically shorten the time it takes to start local development.
This guide will cover using development containers in VS Code but the Development Container Specification is open source and being adopted in other IDEs such as IntelliJ.
Requirements
Make sure you have the following installed:
Running code in a container
Create a basic node file: src/hello.js:
console.log("Hello World!");
Let’s say we want to be able to run and test our node code in a container that is preconfigured with node. Let’s create a local configuration for our dev container. Create a .devcontainer directory and a devcontainer.json file inside the directroy.
Add the following configuration to .devcontainer/devcontainer.json:
{
  "name": "Local Dev Container",
  "image": "node:21-alpine",
  "workspaceFolder": "/workspaces/${localWorkspaceFolderBasename}"
}
This configuration will use the node:21-alpine image as our local dev environment. This container comes with Node 21 preinstalled on Alpine linux.
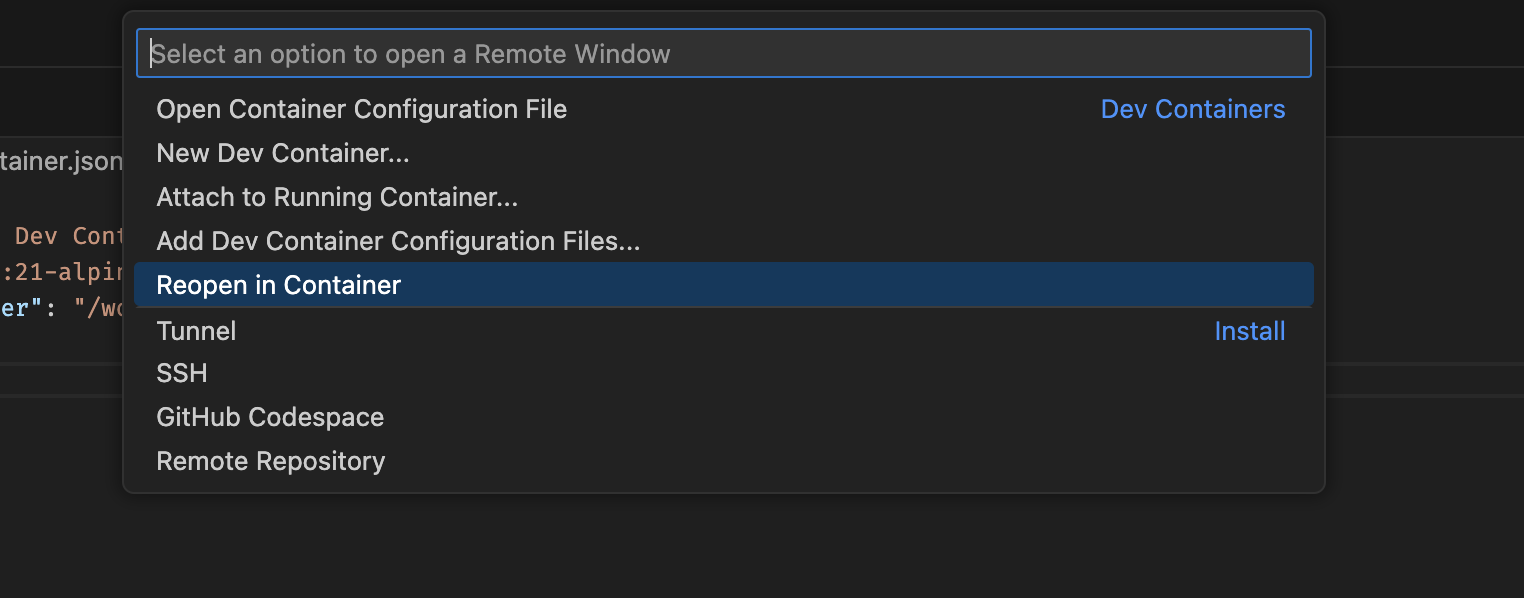
Open the command pallete in VS Code (Ctrl/Command + Shift + P) and select Dev Containers: Reopen in Container.
VS Code will relaunch. Your terminal should now be a linux shell. Run node src/hello.js from the terminal and see the file runs successfully.
/workspaces/devcontainers-demo $ node src/hello.js
Hello World!
/workspaces/devcontainers-demo $
The node:21-alipine image has everything needed to run node code without any more setup.
Exiting/Reopening the container
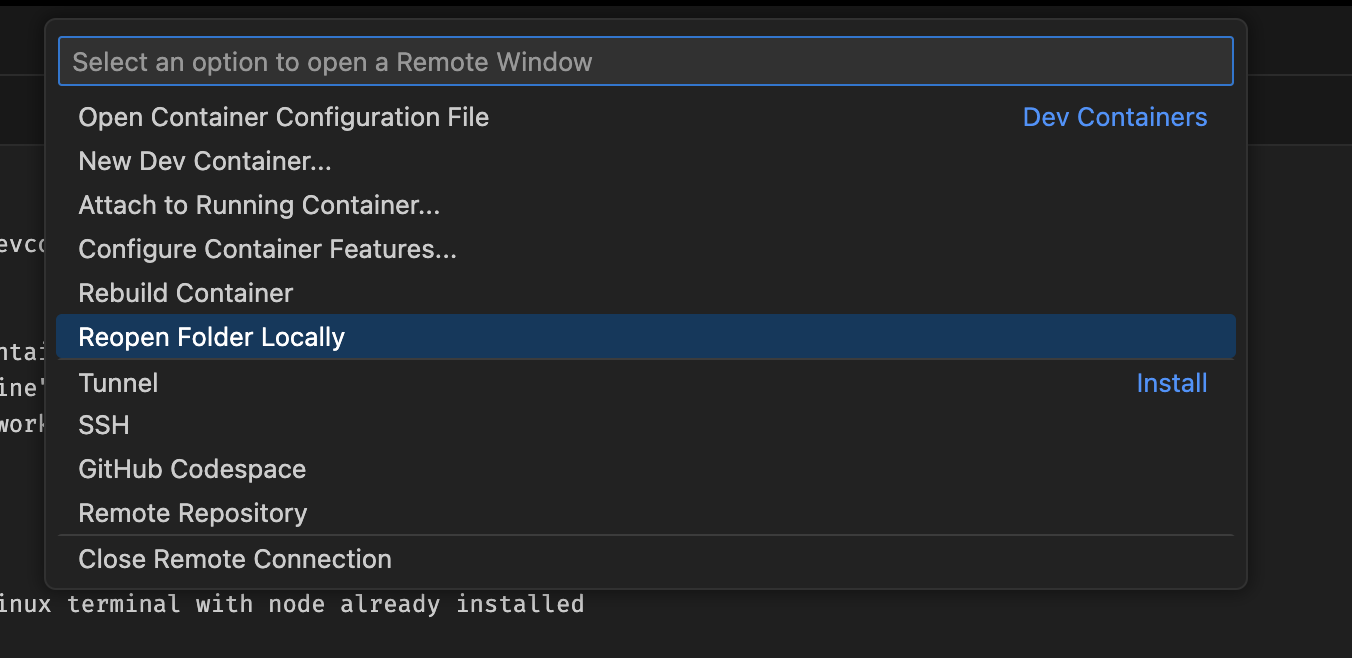
At any point you may want to exit the container. To exit the development contiainer. Open the command pallete in VS Code (Ctrl/Command + Shift + P) and select Dev Containers: Reopen Folder Locally.
To jump back into the container, open the command pallete in VS Code (Ctrl/Command + Shift + P) and select Dev Containers: Reopen in Container.
Custom Dockerfile: Installing git
The node:21-alpine image is great for running a node application but it lacks some of the tools needed for development. For example, you will likely want to use git from inside the container.
We can create a custom docker image that includes the tools we need. Create a file names Dockerfile in the .devcontainer directory.
Add the following to the .devcontainer/Dockerfile:
FROM node:21-alpine

RUN apk update && apk upgrade
# Install git
RUN apk add git
# Install ssh
RUN apk add openssh openrc
Then update the .devcontainer/devcontainer.json to use the new image:
{
  "name": "Local Dev Container",
  "dockerFile": "./Dockerfile",
  "workspaceFolder": "/workspaces/${localWorkspaceFolderBasename}"
}
Now you will need to rebuild the container for the changes to take effect. From the command pallete in VS Code (Ctrl/Command + Shift + P) and select Dev Containers: Rebuild Container. VS Code will relaunch in the new container. You can now use the git cli in the terminal.
/workspaces/devcontainers-demo $ which git
/usr/bin/git
/workspaces/devcontainers-demo $ git init
...
Initialized empty Git repository in /workspaces/devcontainers-demo/.git/
/workspaces/devcontainers-demo $
Using docker compose to mount local files
At this point you would need to resetup your local git configuration and ssh keys to work with github. You would also have to repeat this any time you rebuild the container.
To get around this we can load our local machine’s git configuration and ssh keys into the container. To do this we will use a docker compose file. Create a docker-compose.yml file in the .devcontainer directory.
Add the following to the .devcontainer/docker-compose.yml:
version: "3.8"
services:
  devcontainer:
    build:
      context: .
      dockerfile: Dockerfile
    volumes:
      - ../..:/workspaces:cached
      # Avoid setting up Git in the container
      - ~/.gitconfig:/root/.gitconfig
      # Avoids setting up ssh in container
      - ~/.ssh:/root/.ssh
    command: sleep infinity
Here we are creating a devcontainer service that uses the Dockerfile we created. We then mount three volumes onto the container: one for our workspace files, one for git configuration files and one for our ssh keys.
Now, update the .devcontainer/devcontainer.json to use the new docker compose file:
{
  "name": "Local Dev Container",
  "dockerComposeFile": "docker-compose.yml",
  "service": "devcontainer",
  "workspaceFolder": "/workspaces/${localWorkspaceFolderBasename}"
}
Rebuild the container by opening the command pallete in VS Code (Ctrl/Command + Shift + P) and select Dev Containers: Rebuild Container.
VS Code will relaunch in the new container. You should now be able to clone and push to github using ssh.
Adding a postgres database
One the benefits to using development containers is the ability to spin up multiple containers containing resources such as postgresql, mongodb, redis, etc.
Add a postgres service to the docker-compose.yml file:
version: "3.8"
services:
  devcontainer:
    build:
      context: .
      dockerfile: Dockerfile
    volumes:
      - ../..:/workspaces:cached
      # Avoid setting up Git in the container
      - ~/.gitconfig:/root/.gitconfig
      # Avoids setting up ssh in container
      - ~/.ssh:/root/.ssh
    command: sleep infinity
    links:
      - postgres
  postgres:
    image: postgres:16.2
    environment:
      - POSTGRES_USER=dev
      - POSTGRES_PASSWORD=server
IMPORTANT: Dont forget the links value in the devcontainer section so that the postgres service can be accessed from the devcontainer service.
Now rebuild the container (Open the command pallete in VS Code (Ctrl/Command + Shift + P) and select Dev Containers: Rebuild Container).
We can test the postgres service is up and running by running some node.js code.
Install the pg package:
npm install pg
Create a src/postgres.js file and paste the following code into src/postgres.js:
const { Client } = require("pg");

(async () => {
  const connectionString = "postgresql://dev:server@postgres:5432/postgres";
  const client = new Client(connectionString);
  await client.connect();
  await client.query("DROP TABLE IF EXISTS employee;");
  await client.query("CREATE TABLE employee (name TEXT,age INT);");
  await client.query("INSERT INTO employee VALUES ('John Doe', 34);");
  await client.query("INSERT INTO employee VALUES ('Jack Smith', 42);");

  const data = await client.query("SELECT * FROM employee");
  for (let r of data.rows) {
    console.log(`${r.name} ${r.age}`);
  }

  await client.end();
})().catch(console.error);
Running the code should create a database table, insert some rows, read from the table and output the data.
/workspaces/devcontainers-demo $ node src/postgres.js
John Doe 34
Jack Smith 42
/workspaces/devcontainers-demo $
Adding mongodb
We can follow a similar process for other services such as mongodb. Add a mongodb service to the docker-compose.yml file:
version: "3.8"
services:
  devcontainer:
    build:
      context: .
      dockerfile: Dockerfile
    volumes:
      - ../..:/workspaces:cached
      # Avoid setting up Git in the container
      - ~/.gitconfig:/root/.gitconfig
      # Avoids setting up ssh in container
      - ~/.ssh:/root/.ssh
    command: sleep infinity
    links:
      - postgres
      - mongo
  postgres:
    image: postgres:16.2
    environment:
      - POSTGRES_USER=dev
      - POSTGRES_PASSWORD=server
  mongo:
    image: mongo:latest
    volumes:
      - /data/db
Rebuild the container (Open the command pallete in VS Code (Ctrl/Command + Shift + P) and select Dev Containers: Rebuild Container).
Install the mongodb package:
npm install mongodb
Create a src/mongo.js file and paste in the following code into src/mongo.js:
const { MongoClient } = require("mongodb");

(async () => {
  const url = "mongodb://mongo:27017";
  const client = new MongoClient(url);
  await client.connect();
  const db = client.db("sales-db");

  await db.collection("sales").deleteMany();
  await db.collection("sales").insertMany([
    {
      item: "abc",
      price: 10,
      quantity: 2,
      date: new Date("2014-04-04T08:00:00Z"),
    },
    {
      item: "jkl",
      price: 20,
      quantity: 1,
      date: new Date("2014-04-02T09:00:00Z"),
    },
  ]);

  const salesOnApril4th = await db.collection("sales").countDocuments({
    date: { $gte: new Date("2014-04-04"), $lt: new Date("2014-04-05") },
  });

  console.log(`${salesOnApril4th} sale(s) occurred in 2014.`);

  client.close();
})().catch(console.error);
Running the code should insert some records into mongodb and then read them back out:
/workspaces/devcontainers-demo $ node src/mongo.js
1 sale(s) occurred in 2014.
/workspaces/devcontainers-demo $
Adding extensions
You may have noticed when using development containers your vs code extentions are not installed by default. You can manually install extensions from Extensions explorer. Just select “Install in Dev Container” on the extension page.
You can also set some extensions to automatically install in the dev container. We are going to add a postgres database explorer and monbodb explorer so we can inspect our resources while in the container. Update the .devcontainer/devcontainer.json to include the following extensions:
{
  "name": "Local Dev Container",
  "dockerComposeFile": "docker-compose.yml",
  "service": "devcontainer",
  "workspaceFolder": "/workspaces/${localWorkspaceFolderBasename}",
  "customizations": {
    "vscode": {
      "extensions": ["mongodb.mongodb-vscode", "ckolkman.vscode-postgres"]
    }
  }
}
Rebuild the container (Open the command pallete in VS Code (Ctrl/Command + Shift + P) and select Dev Containers: Rebuild Container).
After the container is rebuilt it will have the PostgreSQL Explorer and MongoDB explorer installed.
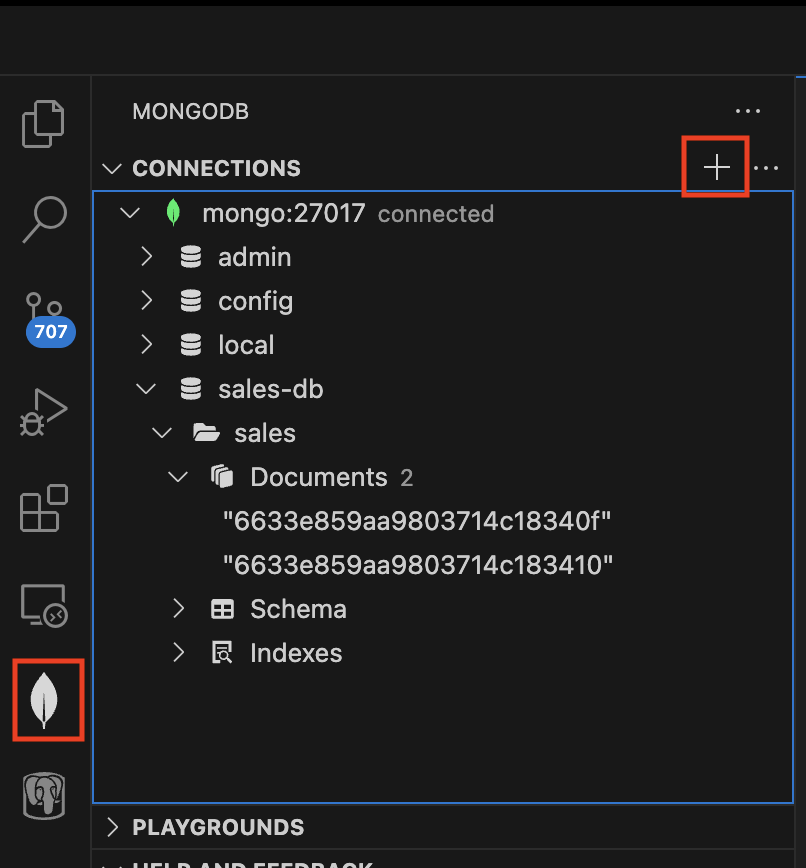
Open the MongoDb panel from the side of VS Code. Add the mogodb server using the connection string mongodb://mongo:27017. You can now explore the sales-db collection we created in our code.
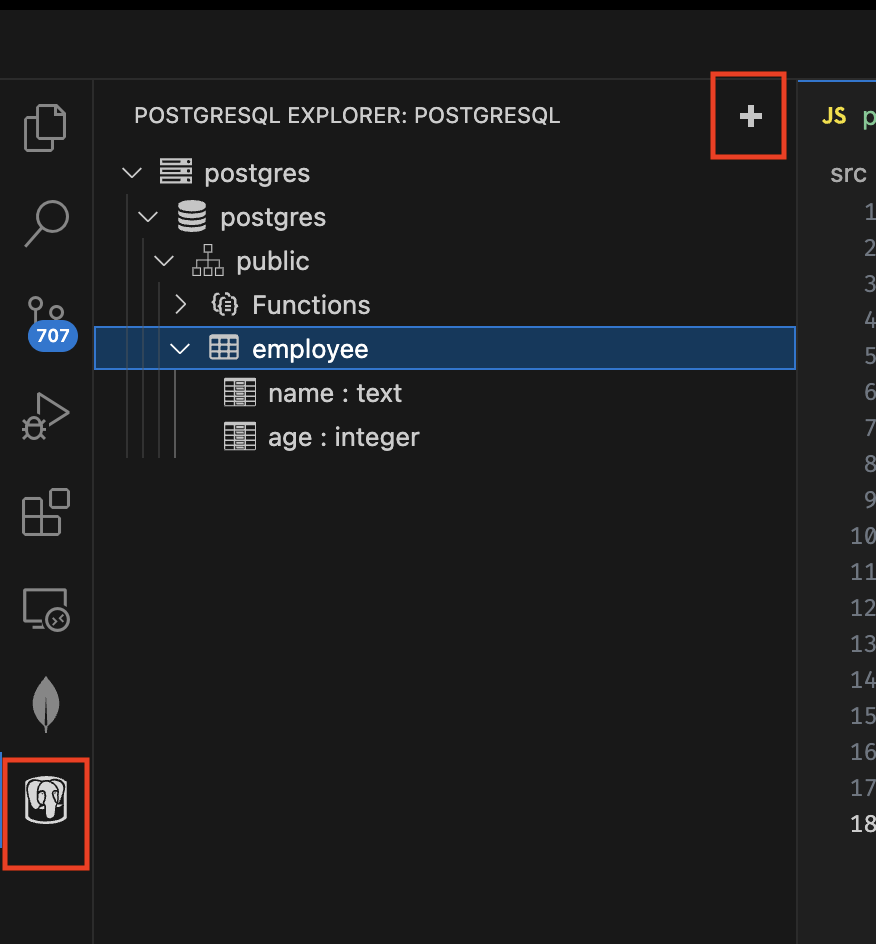
Open the PostgreSQL panel from the side of VS Code. Add the postgres server using:
hostname: postgres
user: dev
password: server
port: 5432
ssl : Standard Connections
You should now be able to explore the employees table we created in our code.
Recap
At this point you should have a functioning node js environment working with a postgres db and mongodb but there is so much more you can do with development containers (Like use localstack to run a fully functional AWS Cloud environment locally in docker)
Source Code: atlas-devcontainers-demo
Documentation: Development Containers.